Thursday, October 29, 2009

Shortie Bars-Let The Christmas Baking Begin

Fig.1. Make sure you enjoy your efforts with a proper espresso before you give these squares away.

It’s that time of year again in The Hungry Italian household. There’s 30lbs of butter in the freezer (I’m not exaggerating), and 30lbs of flour resting next to 30 lbs of sugar in the garage. My wife, Lisa, along with her mother and sister, bake about 30 different types of goodies: Assorted shortbreads, decadent bars and tempting cookies get stuffed into metal tins which are then given out to friends, family and freeloaders alike.
This year I’ve convinced my wife to share some of the recipes, (which is a relief as some of you are aware that baking just isn’t my thing) as well as take pictures of her creations. I hope you give some of them a try; despite the initial investment, you do save money in the long term (just think about all the little presents you hand out: bus driver, teachers, hockey coach, mailman—you get the idea). They’re also great to have handy, just pull them out when company comes over or bring them to your next Christmas party instead of that usual bottle of wine.

Shortie Bars
These squares are basically nothing more than shortbreads with a chocolate surface; this recipe was adapted from the back of an old Chipit bag.
Makes 4 to 5 dozen 1” squares

Ingredients:
1 ½ cups salted butter
¾ cup granulated sugar
3 cups unbleached all-purpose flour
1 to 1 1/2 cups semi-sweet chocolate chips (You can add more if you want a thicker chocolate topping)

Directions:
Preheat your oven to 350F degrees. Cream butter and sugar until light and fluffy; gradually blend in flour until mixed thoroughly (mixture will be crumbly). Pat your dough evenly into a greased 9x13-inch pan. Bake at 350F for 20 to 25 minutes—or until lightly brown. Remove from the oven and immediately sprinkle the chocolate chips evenly over the surface. Let the chocolate completely soften, then spread evenly. Let the chocolate set to a consistency where it’s easy to cut without cracking, cut into squares, then let set properly in the fridge. Freeze until needed.


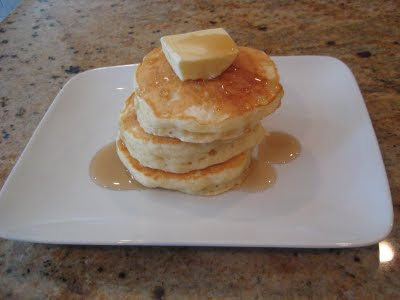
Fig.2. The "ends", as we refer to them, are pieces cut along the sides of the pan which can't really be used because they are not straight and are too crumbly. Fortunately for my son and I, they taste just as good as the squares.

Friday, October 23, 2009

Flippin' Fat Pancakes


Fig.1. Big, light, moist and fluffy.

Our Canada magazine is having a pancake contest. If you have an old favorite or family pancake recipe send it in, there are $5000.00 worth of prizes to be won, courtesy of T-Fal. Go to http://www.ourcanada.ca/ for all the details. The deadline to enter is November 20th, we'll be narrowing it down to 10 recipes, which will be tested, photographed and posted online. The winner will be chosen by the Ourcanada community members-- all you need to do to become a member is visit the web-site and register.
Pancakes are one of the oldest foodstuffs in culinary history. They’ve existed in one form or another since man discovered that mixing water with various ground, whole grains, beans, or rice formed a paste that held its shape.
Today, in North America, we tend to associate pancakes as breakfast fare, but in many parts of the world they are still considered dinner: The French crepe and the Italian crespelle are rolled with such savory fillings ranging from cheese to seafood (although I’ve known the occasional Italian, myself included, who sometime like to smear their crepes with Nutella.) In The Netherlands, a pannenkoeken is a giant, egg-laden pancake that can be stuffed with basically anything the Dutch can think of. In Russia, they have the blini (a personal favorite), which are often served with a dollop of caviar. In Vietnam there’s the crispy and savory Banh xeo, which I usually order with BBQ pork and shrimp.
I could go on and on; every country in the world has their own pancake, instead, holding to the spirit of the contest (which of course I'm not allowed to enter) here’s my favorite breakfast pancake recipe, which I’ve adapted from the gang at America’s Test Kitchen.

Milk and Yogurt Pancakes


The original recipe from, America’s Test Kitchen, calls for buttermilk instead of milk—the buttermilk works equally well but gives it more tang. They also use sour cream, which I’ve replaced with unsweetened, plain yogurt. The yogurt make for a lighter pancake while at the same time imparts the tanginess lent to it by the missing buttermilk.

Ingredients:

2 cups unbleached all-purpose flour
2 tablespoons sugar
½ teaspoon salt
1 teaspoon baking powder
½ teaspoon baking soda
2 cups whole milk
¼ cup+2 tablespoons plain, unsweetened yogurt
2 eggs
3 tablespoons of unsalted butter, melted and cooled slightly
1-2 teaspoons vegetable oil

Directions:

1. Adjust oven rack to middle position and heat oven to 200 degrees. Spray wire rack set inside baking sheet with nonstick cooking spray; place in oven. Whisk flour, sugar, salt, baking powder, and baking soda together in medium bowl. In second medium bowl, whisk together milk, yogurt, eggs, and melted butter. Make well in center of dry ingredients and pour in wet ingredients; gently stir until just combined (batter should remain lumpy with few streaks of flour). Do not over mix. (Over mixing begins the gluten process which will result in tougher pancakes) Allow batter to sit 10 minutes before cooking. Your batter should be quite thick.

2. Heat 1 teaspoon of oil in 12-inch nonstick skillet over medium heat until shimmering. Using paper towels, carefully wipe out oil, leaving thin film of oil on bottom and sides of pan. (Whipping the excess oil from your pan ensures that your pancakes obtain an even, full, golden brown finish, it’s also based on the assumption that you’re not completely incompetent in the kitchen.) Using ¼ cup measure, portion batter into pan in 4 places. Cook until edges are set, first side is golden brown, and bubbles on surface are just beginning to break, 2 to 3 minutes. Using thin, wide spatula, flip pancakes and continue to cook until second side is golden brown, 1 to 2 minutes longer. Serve pancakes immediately, or transfer to wire rack in preheated oven. Repeat with remaining batter, using remaining oil as necessary. I also suggest you try the pancakes before you slather them with butter and maple syrup, you might be very surprised at how well they hold their own.


Fig.2. Fig and tangerine pancakes; place the fruit into the pancake after you drop it into the pan, then flip carefully. A thin flexible spatula is essential for pancakes such as these.

Fig.3. Chocolate chip pancakes, simply add some chips to your batter.


Tuesday, October 13, 2009

Tomato Sauce Redux


Fig.1. For proper canning techniques go to http://www.canningpantry.com/index.html

I’m starting to think that my obsession with tomatoes is unhealthy. I’ve written so much about them, both for the magazine and for this site, that I was sure there was nothing else to say: I was wrong. What keeps driving me is the never-ending (and unattainable) quest for the perfect tomato sauce: I’ve dissected them, peeled them, removed seeds, removed jelly, and passed them all through a myriad of grinders, presses and sieves. Sometimes the sauce turned out, other times, not so much. So after all this time and trial where am I now—I’m back to the tomato, untouched and unaltered.


Fig.2. Cut the tomatoes into manageable pieces, removing only the stem and any bruises or blemishes.


According to a recent study in, The Journal of Agriculture and Food Chemistry, tomato seeds and the surrounding jelly are packed with glutamic acid, a naturally occurring flavour enhancer also known as umami. The skin of the tomato we now know contains Lycopene; a powerful antioxidant. That’s why this year I’ve decided to keep it simple. I’m canning my tomatoes whole as nature intended. When I need to make sauce I simply put the preserved tomatoes in a blender and puree until all of the seeds and skins liquefy. I then make a soffrito of onions and garlic, and bring the sauce to a gentle simmer for a couple of hours.
In case you’re wondering, I got the tomatoes at the Birri Brothers kiosk in the Jean Talon market, which still abounds with beautiful harvest vegetables. I especially want to thank Joe and Mr. Birri for all of your great advice throughout the year (and Joe, the bell peppers were incredible).


Fig.3. Bring the tomato pieces to a rolling boil and skim off any tomato-scum which rises to the surface.


Fig.4. Put some fresh basil in your sterilized jars and fill with the boiling sauce. If your jars and your sauce are hot enough your jars should seal. It's very important to verify that each jar has properly sealed. If after 5 to 6 hours a jar has not sealed place the jar in a water bath and bring to a boil.